
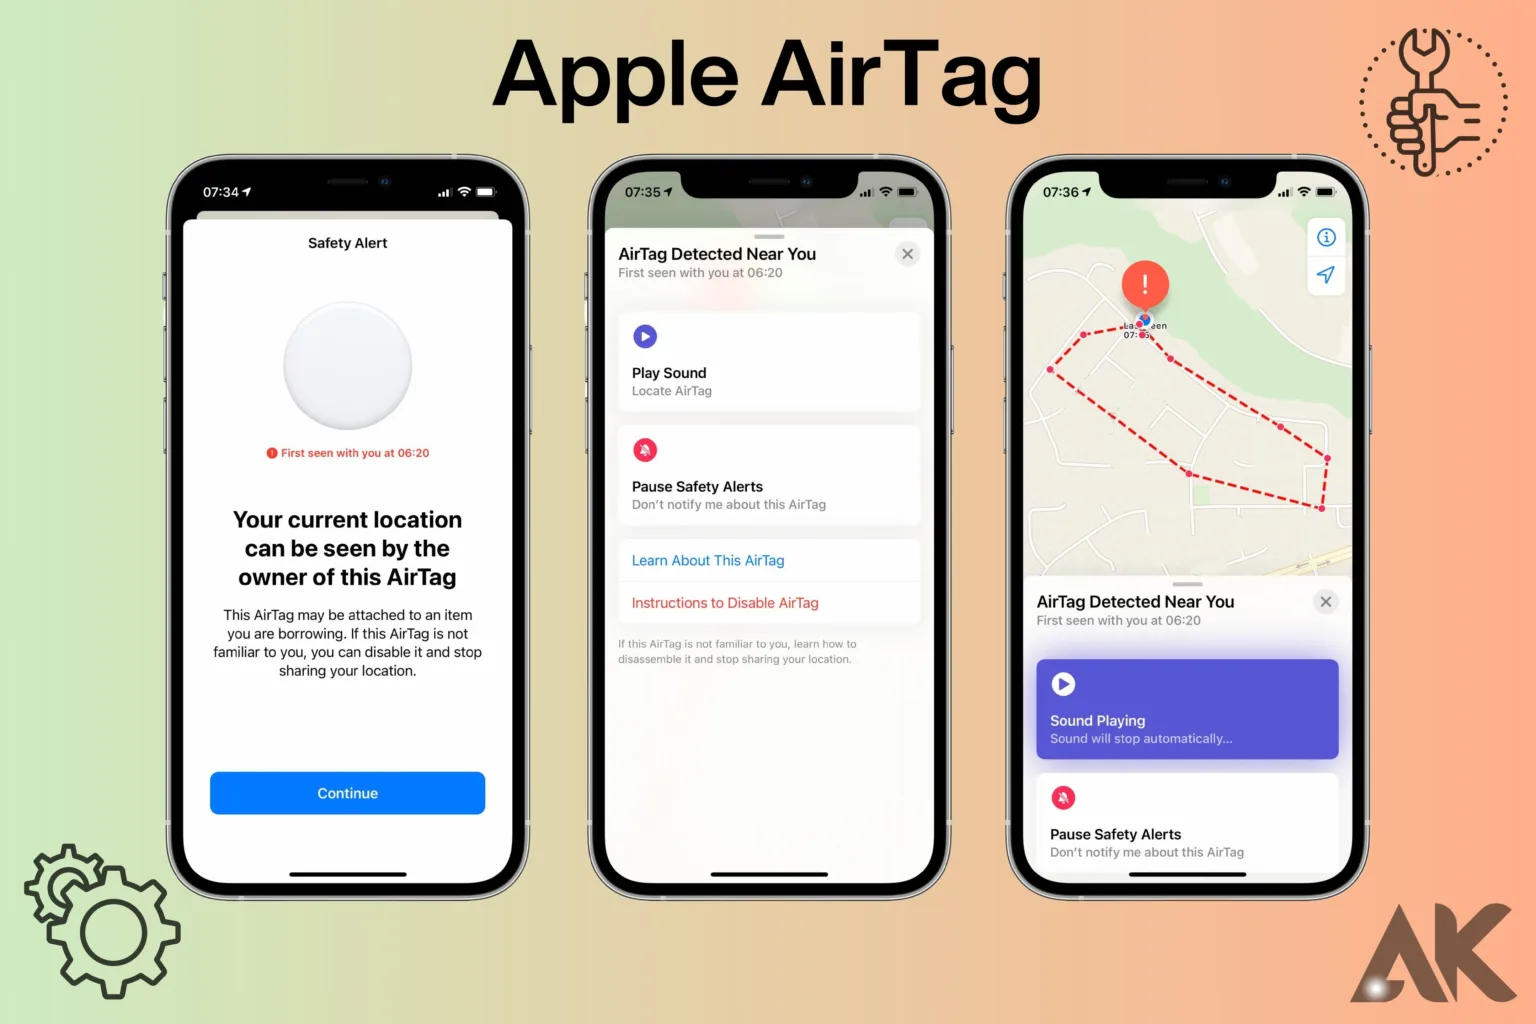
With the Apple AirTag, it’s easy to keep track of things. Our 2024 setup guide will walk you through the easy download process so you can get up and running right away. Apple’s advanced technology makes it easier than ever to keep track of your things. The AirTag says it will be your reliable friend, whether it’s for your keys, your backpack, or even your pet. It’s easy to pair your AirTag with your computer if you follow our simple steps. Goodbye to the stress of losing things and hello to peace of mind. Allow us to begin this journey of ease together!
Introducing the Apple AirTag
When it comes to smart technology, Apple always comes up with new ways to solve problems that people face every day. The Apple AirTag is no different. Designed to help you keep track of your things, this small device works with your Apple environment without any problems. Of course, the right Apple Air Tag setup is necessary to get the most out of it.
The Apple Air Tag setup process is easy, so even people who aren’t very tech-savvy can do it without any problems. You can connect your AirTag to your iPhone or other Apple devices in just a few easy steps. This lets you use accurate tracking and location services. The AirTag gives you peace of mind because you can quickly find your things with the touch of a button, whether you’re protecting your keys, wallet, or bags.
For the Apple Air Tag setup to work, your device needs to have the most recent version of iOS or iPadOS. Then, bring your AirTag close to your device, and it will find it on its own. To connect the AirTag to your Apple ID, just follow the steps shown on the screen. Then, change the settings to suit your needs.
Following a simple setup, the Apple AirTag works invisibly in the background, using the large network of Apple devices to correctly find your belongings. The AirTag will help you find your thing accurately, no matter how close it is or how far away it is.
The Apple Air Tag setup process is quick and easy, making it easy for users to keep track of their valuables in the Apple environment. Doing a few easy things will give you the peace of mind that comes from always being able to get to your things.
Apple Air Tag setup: Unboxing Your Apple AirTag
You’ll find the Apple Air Tag setup itself, along with a quick start guide and a key ring, when you open the box. Before moving on, take a moment to look over the AirTag for any signs of damage or flaws. After making sure everything is in good shape, you can start setting up the Apple Air Tag computer.
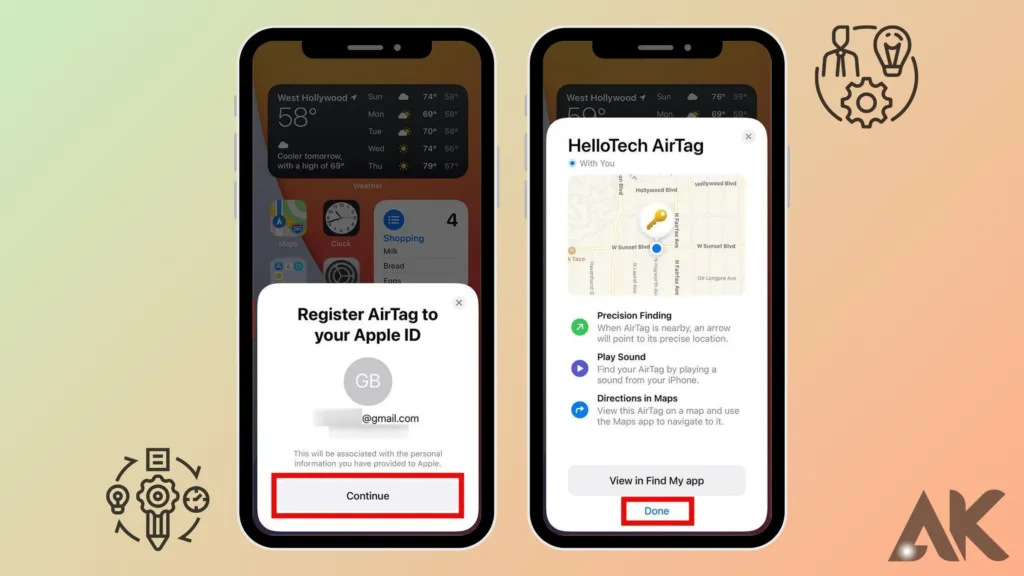
First, make sure your iPhone or another Apple device that works with this is close by and turned on. This closeness is very important for the pairing process to go smoothly. On your phone, open the Find My app and tap the “Add” button. The Apple Air Tag setup starts when you follow the steps shown on the screen.
The Apple Air Tag setup will tell you to bring the AirTag close to your device. This closeness lets the AirTag automatically find your device and pair it with it. It will then walk you through the setting process, which includes giving your AirTag a name and choosing how you want it to work.
Your appreciation for how easy and natural the process is will grow as you go through the setup. At every step, the Find My app gives you clear directions, so even first-time users can easily set it up. Once you’ve set up your Apple AirTag, it’s ready to use, and the key ring that comes with it lets you connect it to your things.
In conclusion, taking your Apple AirTag out of the box and setting it up is a simple process that will get you tracking your things quickly and easily. You can be sure that your valuables are close by whenever you need them if you follow the setup guidelines for the Apple Air Tag.
Apple Air Tag setup: Preparing Your iPhone
It is crucial to make sure that your iPhone is prepared before beginning the Apple AirTag setup procedure. To begin, make sure that your device has the most recent version of iOS or iPadOS. This step is very important because it makes sure that the AirTag works with everything and lets you use its newest features. It’s easy to update your iPhone. Go to Settings > General > Software Update and, if there’s an update, follow the on-screen instructions to download and install it.
Next, on your iPhone, turn on Bluetooth and Location Services. These features are necessary for your device and the Apple AirTag to be able to talk to each other without any problems. When you turn on Bluetooth, your iPhone can find the AirTag and pair it with it. Location Services give you more accurate tracking options. You can turn on Bluetooth and Location Services by going to Settings > Bluetooth and Settings > Privacy > Location Services and flipping the switches to “On.”
You’re ready to start the Apple Air Tag setup process once you’ve updated your iPhone’s software and made sure all the necessary settings are set. Open the Find My app on your iPhone and follow the on-screen prompts to add and set up your AirTag. It will walk you through giving your AirTag a name and choosing how you want it to work, such as sending alerts and sharing your location, during the setup process.
Finally, getting your iPhone ready for the Apple Air Tag setup makes sure that everything goes smoothly. By changing the software on your device and turning on Bluetooth and Location Services, you set up your AirTag to communicate and track your device correctly.
Activating Your AirTag
Activating the device is the first step in the Apple Air Tag setup process. This is easy to do: just open the Find My app on your iPhone. Once the app is open, go to the “Add” section, which is usually marked with a “+” sign or a choice that says “Add New Item.” When you do this, the app will start looking for Air Tags nearby.
The Find My app will walk you through the Apple AirTag setup process after you choose “Add New Item” with its simple and user-friendly on-screen directions. These step-by-step instructions make sure that even people who have never set up something before can do it with trust.
The Apple AirTag setup will tell you to bring the Apple Air Tag setup close to your iPhone. This closeness lets the two devices talk to each other without any problems, making it easy for the AirTag to automatically find and pair with your iPhone.
By following the on-screen instructions, you’ll be able to set up your AirTag, which includes giving it a name and customizing its settings to suit your needs. There may be choices for notifications, sharing your location, and other personalized features in these settings.
With the setting done, your AirTag is ready to use. Now you can attach it to your things using the key ring that came with it or another way that works. After setting up, your AirTag is now part of the Apple environment and can help you keep track of your valuables more easily and accurately.
The easy-to-use Find My app makes activating your AirTag through the Apple AirTag setup process a simple job. By following the steps on the screen, you can quickly set up your AirTag and start using its tracking features.
Connecting Your AirTag
Connecting the device to your iPhone is the first step in the Apple Air Tag setup procedure. Designed to make it easy to join your Apple environment, the process is smooth. Hold the AirTag close to your iPhone to start. This closeness sets off the automatic recognition feature, which makes the connection process easier.
Once your iPhone finds the AirTag, use the Find My app to set up the link by following the on-screen instructions. In this step, you usually agree that you want to connect the AirTag to your iCloud account. This is necessary for the AirTag to be able to track all of your Apple devices.
The easy linking process during the Apple Air Tag setup will be a plus. The Find My app walks you through each step, so even people who aren’t good with computers can use it. As you follow the on-screen instructions, you’ll be able to change settings and choices to suit your needs.
Once the link is complete, the Apple Air Tag setup will work with your Apple products without any problems. This connection gives you access to a wide range of features that make it easy and accurate to keep track of your things. You can count on your Apple Air Tag setup to help you find your keys, wallet, or backpack whenever you need to.
Finally, using the Apple Air Tag setup process to connect your AirTag to your iPhone is a simple step that makes tracking easy and gives you peace of mind. If you follow the directions in the Find My app, you can quickly connect your AirTag to the Apple environment and start using all of its features.
Assigning a Name and Emoji
Giving your Apple AirTag a name and an image is one of the first steps in the Apple Air Tag setup process, which emphasizes personalization. It’s easier to find your AirTag among the other things in the Find My app and it gives it a little more personality.
Launch the Find My app on your iPhone and look for your AirTag among the devices it lists. You can change your Air Tag’s name and symbol by tapping on it to get to its settings. Put something like “Keys,” “Backpack,” or “Luggage” as the name of the thing you want to keep track of. This name will show up big in the Find My app, making it easy to find the thing that the AirTag is attached to.
Next, pick an image that you want to connect to your AirTag. Even though they’re just for fun, emojis can help you quickly recognize your Apple Air Tag setup. It’s up to you. Pick an emoji that fits the thing you’re tracking, like a key for your keys or a suitcase for your luggage.
Because you gave your AirTag a name and an icon, it will be easier to find and tell apart from your other things in the Find My app. This easy step of customization makes the experience better for the user and gives your data more of a personal touch.
Giving your Apple AirTag a name and an image during the setup process is a small but important step that makes it easier to use and makes your tracking experience more personal. Adding this unique touch to your AirTag will make it easier to find your things and give your tracking a little more personality.
Selecting a Precision Finding Sound
There is one feature that really stands out in the Apple Air Tag setup process: Precision Finding. This advanced technology uses ultra-wideband technology to help you find your lost item very accurately. You can make this experience even better by giving your AirTag a unique sound. This will make it even easier to find precisely.
Precision Finding makes it possible for your Apple Air Tag setup to track things in a whole new way. With the help of ultra-wideband technology, your iPhone can give you exact directions to your lost item, taking you straight to where it is. In situations where your item might be hard to see or hidden by other things, this function comes in very handy.
In the Find My app, go to the settings for your Apple Air Tag setup to change how Precision Finding works for you. This is where you can choose a sound for your AirTag. Pick a sound that stands out to you, making sure it’s clear and easy to spot among other sounds. Chirps, pings, and musical tones are all popular choices, but you can pick any sound that speaks to you.
After you choose a sound for your Apple Air Tag setup, Precision Finding will be even easier to understand and use. The clear sound will point you exactly in the direction of your lost item, making it easier and faster to find. You can hide your AirTag under a pile of clothes or in the corner of a crowded room, and the sound will find it.
The usefulness of this advanced feature is improved by choosing a Precision Finding sound during the Apple Air Tag setup process. You can make it easier to find your lost things and have a more personalized tracking experience with your AirTag if you pick a unique sound that speaks to you.
Testing Your AirTag
Following the Apple Air Tag setup process, you should make sure that your device is working properly before using it to keep track of your things. It is easy to test your AirTag, which makes sure that it works correctly and reliably in real life.
Open the Find My app on your iPhone and choose your AirTag from the list of devices. This will start testing your tag. This action will show you where it is right now on a map, so you can see where it is at all times. Note how accurate the location info is and make sure it matches up with where your AirTag is now.
Next, try using the Apple Air Tag setup in different situations to see how well it works for tracking. You can move the AirTag around your home or office and use the Find My app to keep track of where it is at all times. Make sure that the app correctly tracks the AirTag’s movements and instantly sends accurate location updates.
You could also test the AirTag’s range by putting it in different rooms or places and then using a smartphone to find it. This test will help you figure out what the AirTag can and can’t do when it comes to tracking and make sure that it stays connected to your iPhone even when there are walls or other obstacles in the way.
You can be sure that your AirTag is ready to reliably track your things whenever you need it by trying it carefully after setting it up. If you run into any problems while testing, you can use Apple’s support tools to get help and advice on how to fix them.
In conclusion, trying your AirTag is an important part of the Apple Air Tag setup process that makes sure it works correctly and reliably in real life. By using the Find My app to find out where it is and trying out different situations, you can make sure that your AirTag is working right and ready to help you easily keep track of your things.
Conclusion
The Apple Air Tag setup is easy and makes you feel much safer. These easy steps will make sure that your things are always close at hand, whether you’re at home or on the go. After you’ve set up your AirTag, you should test it to make sure it works correctly and reliably in real life. With Precision Finding and custom settings, the AirTag is a great way to keep track of your things. You can trust the Apple Air Tag setup process to make tracking easier and keep your things safe and easy to get to wherever you go.
FAQS
Q1: Can I use multiple AirTags with a single iPhone?
A. Yes, you can connect multiple AirTags to the same iPhone and track them simultaneously.
Q2: How long does the battery last on an AirTag?
A. The battery life of an AirTag depends on various factors, but it typically lasts for about a year with normal usage.
Q3: Can I track an AirTag if it’s out of range of my iPhone?
A. If your AirTag is out of Bluetooth range, you can still track its last known location using the Find My network.
Q4: Is it possible to disable tracking on an AirTag?
A. Yes, you can disable tracking on an AirTag by removing it from your iCloud account.
Q5: Are AirTags waterproof?
A. While AirTags are not fully waterproof, they are designed to withstand splashes and brief immersion in water.