
Want to know how to change the battery in your Apple AirTag? In 2024, keeping your Apple Air Tag battery replacement working well will require a regular battery. This easy servicing job keeps your tracker operating, allowing you to keep track of your valued objects without disruption. In this guide, we’ll take you through the steps, including when you should change the battery and what you’ll need. Are you prepared to keep your AirTag powered up? Let’s get ahead.
Understanding the Apple Air Tag Battery replacement
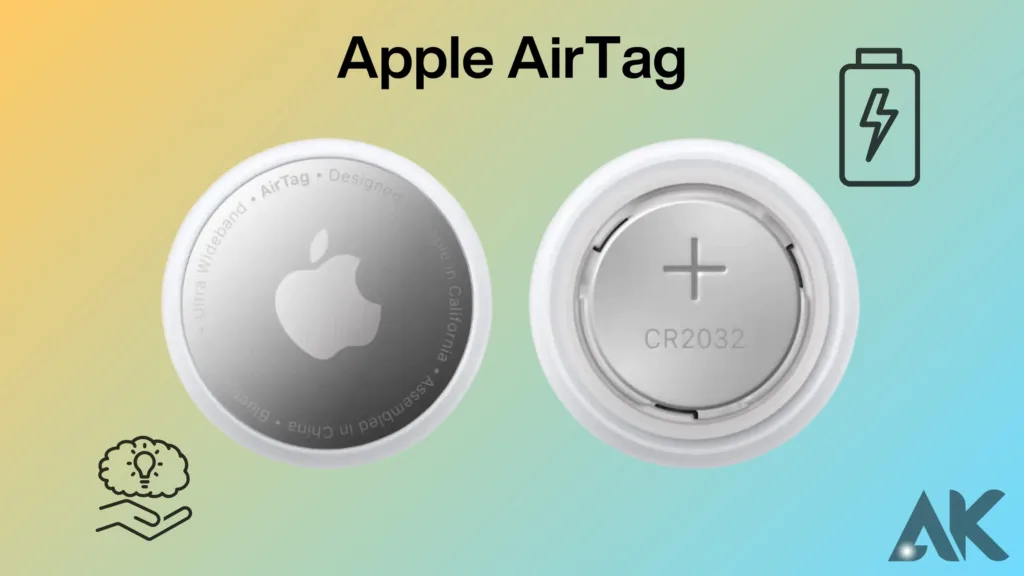
The Apple AirTag batteries are a vital part of keeping your tracker functional and your valuables safeguarded. It is powered by a CR2032 coin cell battery, which is commonly used in gadgets due to its small size and constant energy output.
This lithium-based battery is ideal for the AirTag’s low-energy specifications, providing a balance of reliability and power. In general, you should expect the battery to last around a year with regular use, which is quite remarkable for a device that is continually transferring signals to follow your belongings.
Extreme temperatures and frequent use, on the other hand, could decrease battery life and cause it to run out more quickly. When the battery gets closer to the end of its life, your iPhone will let you know that it is time for a replacement.
The AirTag design looks good because it is simple to use—you can replace the battery without the need for particular equipment or technical knowledge. This makes the AirTag a useful and affordable alternative for tracking what you own, and you can easily maintain its functioning without assistance from professionals.
Signs That Your Battery Needs Replacing
Your Apple AirTag is like an experienced companion, always ready to help you in finding your keys, wallet, or even your dog if they wander off. However, as with other electrical devices, the battery will not last forever. Knowing the signals that your AirTag battery needs to be replaced is critical for keeping track of your resources.
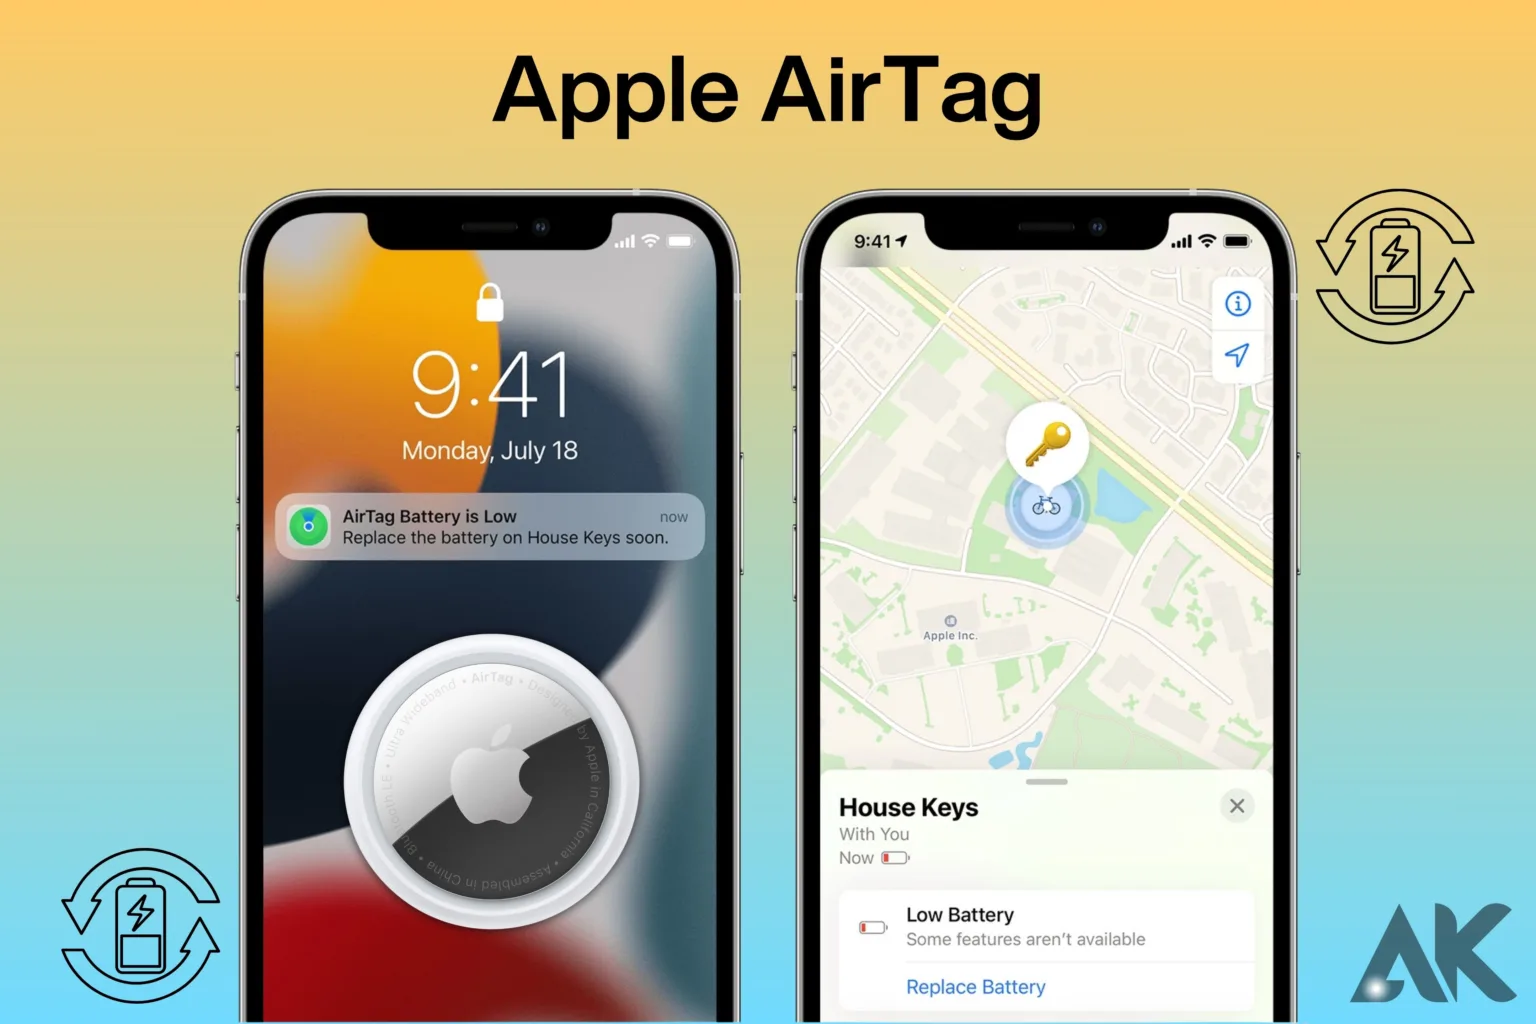
The most visible signal is when your iPhone notifies you that the AirTag’s battery is low. This is the initial warning, and it is best to respond quickly after receiving it. If you overlook this message, your AirTag’s performance will slowly a state of decline You may notice that the signal range is limited, or that the Find My app takes longer to locate the AirTag.
If the battery drains fully, the Apple Air Tag battery replacement will stop reacting and become useless for tracking. A further warning sign is if the AirTag does not respond when reached via the app. This could suggest that the battery is enough to power the device’s audio capability. If you see any of these signs, it’s time to replace the battery. Staying proactive with battery replacement ensures that your AirTag remains an effective tracking tool, keeping everything you own safe and secure.
Tools You’ll Need for Battery Replacement
Replacing the battery in your Apple AirTag is a simple task that requires no special tools. The instruments required are basic, making the work accessible to everyone. Before you begin, make sure you have the following on hand:
- CR2032 Battery: This is the core of your AirTag, a little coin-cell battery that powers your tracker. To achieve the greatest results, use a new, genuine CR2032 battery.
- level Surface: A clean, level surface is required for working on your AirTag. It helps you keep track of small parts and provides a stable surface for opening and closing the gadget.
- Steady Hands: While not a physical tool, having steady hands and a little patience is essential. The components inside the AirTag are sensitive, therefore avoid using excessive force or rough handling.
To help twist open the AirTag’s back cover, you can use a small flat screwdriver or a coin. However, these are not technically necessary because the AirTag is intended to be user-friendly. With these easy tools, you’ll be able to quickly replace the battery and restore your AirTag’s functionality.
Opening the Apple AirTag
Opening the Apple AirTag battery replacement is the first, and maybe most important, step in replacing its battery. While the process is basic, it is essential to handle the device with carefully to avoid damaging its internal components. To get started, choose a clean, flat surface where you can work comfortably.
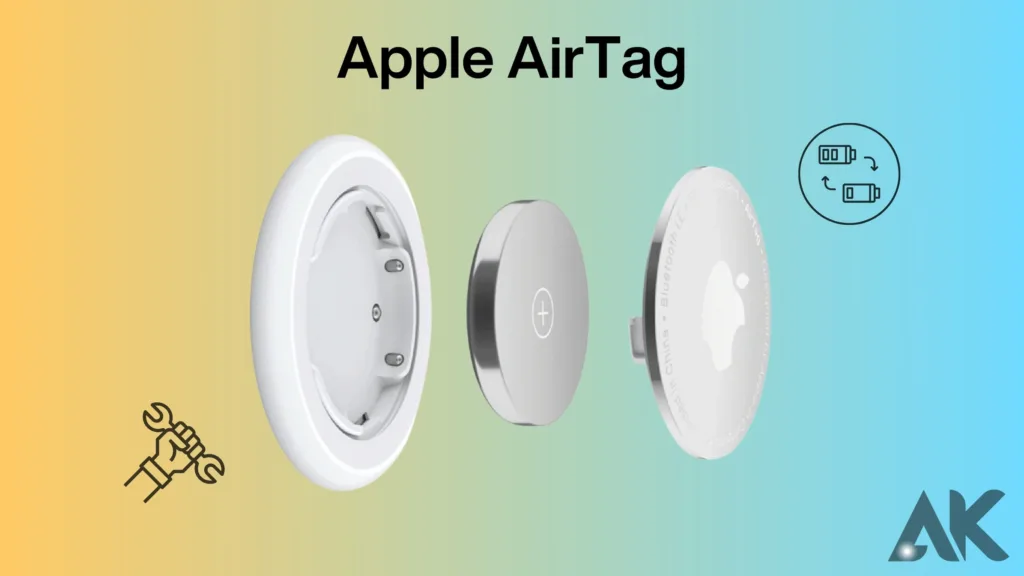
This keeps parts from moving away and provides a secure surface for working on. Place the AirTag face down on the surface, polished stainless-steel side facing up. To open the AirTag, press hard on the steel lid and spin counterclockwise. It simply takes about a quarter of a revolution to feel it unlock.
If you are having difficulties turning it in, don’t use too much effort. However, try pressing down harder or using a small device, such as a coin or a flathead screwdriver, to increase pressure. Once the back cover is free, gently remove it to see the battery area. Because the AirTag’s components are delicate and small, you should avoid touching or damaging them.
With the lid removed, you’re ready to replace the battery. To avoid losing the cover, keep watch of it while you work. Properly opening the AirTag prepares the way for a smooth battery replacement operation, allowing you to finish the job with confidence.
Removing the Old Battery
Removing the old battery from your Apple Air Tag battery replacement is a simple but important step in updating it. When you open the AirTag’s back cover, you should notice the CR2032 coin cell battery inside. To remove it, carefully pull it with your fingers. If it seems stuck or difficult to remove, try a small sharp screwdriver or a similar gadget to pry it out. Just make sure not to apply too much pressure or damage the inside components.
It’s important to remember that the AirTag’s inner parts are sensitive, so remove the battery using as little force as possible. If you notice any signs of corrosion or leakage on the old battery, handle it carefully and dispose of it properly, as these signs may signal battery damage.
Once the old battery is removed, store it in a secure location to avoid misplacement or accidental contact with other electronic equipment. This will also prevent any environmental damage from unsuitable disposal.
With the old battery absent, you’re one step closer to getting your AirTag back to work. The next step is to insert the new battery and ensure suitable alignment, but safely removing the old battery is essential to a successful replacement activity.
Inserting the New Battery
Putting a fresh battery into your Apple Air Tag battery replacement is necessary for restarting your tracker. After removing the old battery, make sure that the interior is clean and free of dust or corrosion. Take your new CR2032 coin cell battery and note that it has two sides: positive (+) and negative (-). The positive side usually involves the one with the brand name or writing on it.
To place the replacement battery, connect it to the compartment within the AirTag, making sure the positive side faces up. Carefully press it into place until it clicks or sits securely. There should be no need for excessive force—just a little touch to keep it firmly seated. If you are confused about the orientation, consult AirTag’s internal contacts; there may be clues to assist you.
After inserting the new battery, test the Apple Air Tag battery replacement by putting the back cover and starting the Find My app on your iPhone to check whether it recognizes it. This step confirms that the replacement battery is correctly installed and functional. If everything checks out, you’re ready to go. If not, verify the battery configuration and try again.
With the new battery installed, you’re almost done. Just a few more steps for reassembling the AirTag, and you’ll be able to track your assets with certainty.
Closing the Apple AirTag
Closing the Apple Air Tag battery replacement the battery is a simple but important activity. Once you’ve installed the new CR2032 battery, reattach the back cover carefully. Start by matching the stainless steel cover with the AirTag body. You may notice minor notches or alignment points on the cover and AirTag that might direct you to the proper position.
Place the cover over the AirTag’s battery box and gently press it down. Twist the cover clockwise, giving some pressure, until it clicks into place. This click represents that the cover is properly locked, which prevents unintentionally opening and keeps the battery in place. If you do not hear a click, the cover may not be correctly placed. In that case, remove the lid and try again, twisting firmly yet carefully.
After you’ve closed the AirTag, give it a quick test. Open the Find My app on your iPhone and see if the AirTag is shown. You can also contact it to ensure that it makes a sound, showing that the battery maintenance was successful and that the AirTag is working properly.
Closing the Apple Air Tag battery replacement properly is critical for its durability and waterproofing. An improperly closed cover might let moisture or dust into the AirTag, decreasing its performance. By following these directions, you can ensure that your AirTag is securely closed and ready for monitoring your belongings for the next year or so.
Testing the Apple AirTag
Testing your Apple Air Tag battery replacement is a vital step in ensuring it works effectively. After you’ve closed the AirTag and ensured that the back cover is properly secured, it’s time to check if your tracker is back online. Here’s how you can do it.
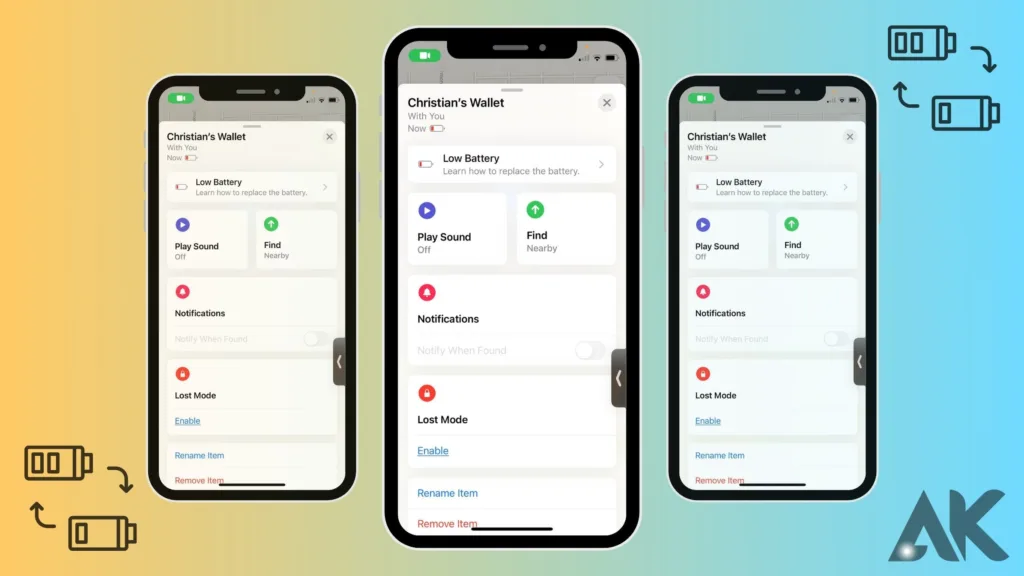
First, launch the Find My app on your iPhone. If the AirTag has been correctly reorganized, it should appear among your devices. If it does not appear, double-check that you have properly closed the AirTag and try again. If it appears, tap on it to get its details. From there, you can view its current status, battery level, and location.
To see if the Apple Air Tag battery replacement is operating properly, try the “Play Sound” functionality. Tap the button, and the AirTag should produce a tone that can help you in locating it. If you hear the sound, it means the battery has been replaced successfully and the AirTag is now working. If you don’t hear anything, likely, that the battery was not properly placed, the lid was not completely closed, or there was some problem with the AirTag.
If everything checks out, you can try the AirTag’s reliability tracking with a compatible iPhone model. This feature uses visual signals and haptic feedback to help you find the exact placement of the AirTag.
Properly Disposing of the Old Battery
When it comes to replacing your Apple Air Tag battery replacement, one of the most crucial measures is to properly dispose of the old battery. The AirTag’s CR2032 coin cell battery includes lithium, which is dangerous if not managed properly. Throwing old batteries in regular trash is not just bad for the environment; it can also be dangerous.
First, after removing the old battery, store it apart from other items. Placing it in a small plastic bag or another container helps to avoid accidental contact with other metals or electronics. This lowers the chance of sparks or short circuits.
Next, contact your local waste management authority or recycling center to determine where you can dispose of lithium batteries. Many cities provide particular collecting stations for batteries, ensuring that they are handled and recycled securely. Some electronics and home improvement businesses now provide battery recycling bins, so you can easily drop off undesirable batteries on your next visit.
Another option is to join in community battery collection events, which are frequently held to encourage safe disposal and recycling. These activities are an excellent way to ensure that your old battery does not end up in a garbage dump, where it may harm the environment.
Conclusion
Replacing your Apple Air Tag battery in 2024 is a simple process. Screw off the back cover, remove the old CR2032 battery, and replace it with the positive side facing up. A secure fit guarantees that your Apple Air Tag battery replacement remains working. Keeping an additional battery on hand is a good idea, especially if you use Air Tags for monitoring vital objects like keys or history. To prevent unexpected problems, continually monitor the battery condition in the Find My app. A simple adjustment may extend your Air Tag’s life and keep it dependable.
FAQ
What kind of battery does the Apple AirTag use?
The Apple AirTag uses a CR2032 lithium coin cell battery. This type of battery is commonly used in small electronics and can be found at most hardware or electronics stores.
How often do I need to replace the AirTag battery?
Typically, the CR2032 battery in an Apple AirTag lasts about a year with regular use. However, factors like extreme temperatures or frequent tracking can shorten its lifespan.
How do I know when my AirTag battery is low?
Your iPhone will send you a notification when the AirTag’s battery is running low. It’s best to replace the battery soon after receiving this alert to avoid losing functionality.
Can I replace the AirTag battery myself?
Yes, you can replace the battery yourself. The AirTag is designed to be user-friendly, so you don’t need special tools or technical expertise to replace the battery.
Is it safe to throw the old battery in the trash?
No, it’s not safe to dispose of lithium batteries in regular trash. Always take used batteries to a recycling center or a designated battery disposal site to ensure proper handling and avoid environmental harm.