
DNS leak test and how to fix it Have you ever utilized a virtual private network (VPN) to protect your online privacy only to discover that your ISP still has access to the websites you visit? A DNS leak might be occurring there. Many people believe that using a VPN by itself will keep them safe and anonymous online, but in reality, there is a hidden problem that could covertly reveal your personal information even while you are using it. DNS leaks are a hidden problem that occurs more frequently than you might imagine.
Everything you need to know about a DNS leak test and how to fix it is covered in this blog post. Even if you’re not a tech expert, you can still follow along because this instruction is specifically designed for novices. We’ll go over the definition of a DNS leak, why it compromises your privacy, how DNS typically functions, what causes these leaks, how to check for them, and—above all—how to remedy them. By the end, you’ll be confident enough to independently examine and guard your online privacy, step by step.
What Is a DNS Leak?
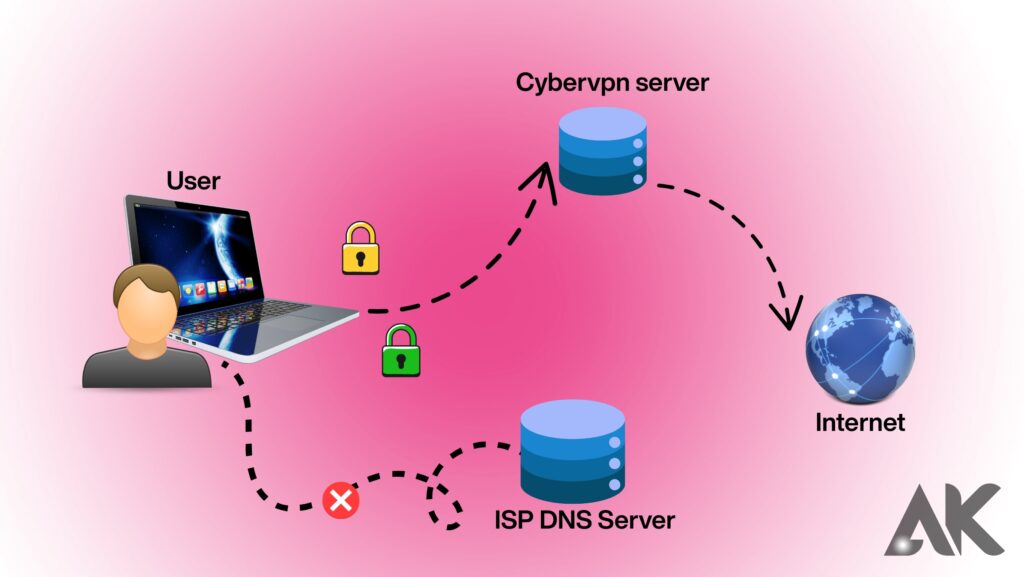
When your device sends DNS (Domain Name System) requests to servers outside the encrypted tunnel of your VPN—typically to the DNS servers of your internet service provider—a DNS leak occurs. A DNS leak can covertly reveal the websites you’re viewing, even if you’re using a VPN to safeguard your browsing information. This implies that your ISP or any other third party watching your internet traffic is aware of your online activities.
Imagine your VPN as a tunnel that hides everything you do online to better grasp this. A DNS leak is similar to a breach in the tunnel that allows your data to escape. Your private surfing history isn’t so private after all, as the DNS leak makes the names of websites you attempt to access public. This negates the benefit of utilizing a VPN and may expose you to hacks, tracking, and monitoring.
Why DNS Leaks Are a Privacy Risk
Because DNS breaches expose your online activity, they pose a major privacy danger. activity even if you have a VPN installed. Your DNS requests reveal the websites you visit, when you visit them, how frequently you visit them, and in certain situations, even your geographical location. service provider can monitor and record everything you do online if this information spills. There may be more serious repercussions, such as government monitoring or legal problems, if your nation has stringent privacy laws or surveillance programs.
Furthermore, hackers can more easily follow your activities, steal your data, or target you with phishing scams thanks to DNS breaches. DNS leaks can be harmful to anyone who depends on the internet for sensitive research, banking, or employment. Therefore, if you are concerned about safeguarding your personal information and digital privacy in the current online environment, you must learn about DNS leak test and how to fix it.
How DNS Works in Normal Internet Browsing
| Step | Action | Explanation |
|---|---|---|
| 1 | User Enters Website | You type a domain name like www.example.com in your browser. |
| 2 | DNS Resolver Checks Cache | The DNS resolver checks if it already knows the IP address from a previous lookup. |
| 3 | Query Sent to Root Server | If not in cache, it asks the root DNS server where to find the domain’s TLD server. |
| 4 | TLD Server Response | The root server directs the resolver to the TLD server (like .com or .org). |
| 5 | Contacting Authoritative Server | The resolver asks the authoritative DNS server for the IP address of the website. |
| 6 | IP Address Found | The authoritative server responds with the correct IP address for the website. |
| 7 | Connecting to Website | Your browser uses this IP address to connect and load the website. |
| 8 | Caching for Future | The resolver saves (caches) the IP address to speed up future visits. |
Common Causes of DNS Leaks
DNS leaks occur for a number of reasons. One frequent One frequent reason for DNS leaks is inadequate VPN settings. Installing a VPN might sometimes lead consumers to believe that everything will be automatically protected. However, if the VPN doesn’t alter your device’s DNS settings, it may continue to use the default DNS servers provided by your ISP. Operating system behavior is another factor. For instance, unless modifications are made manually, Windows and macOS may overrule the DNS settings provided by the VPN. Even worse, computer upgrades have the ability to return those settings to their original state.
Using a free or poor VPN service is another frequent reason. The risk of leaks is increased by the fact that many free VPNs do not utilize their private DNS servers or provide DNS leak security. DNS leaks can potentially result from IPv6 traffic if your VPN isn’t handling it properly. Your machine may transmit DNS requests via an unprotected IPv6 channel since some VPNs only safeguard IPv4 communication. Because these leaks occur covertly, it’s crucial to use aDNS leak test and how to fix it method to verify your system and preserve your online security.
What Is a DNS Leak Test?
A DNS leak test is a tool to test whether your DNS requests are being safely routed through your VPN or leaking to your ISP or other third parties. It displays the DNS servers that are in use by your device. You are secure if you see servers that belong to your VPN provider. However, a DNS leak is occurring if the results display servers that are either part of your ISP or are situated in your nation of residence.
The procedure is quick and straightforward. You go to a website that tests for DNS leaks, click a button to start the test, and then watch for results. You can determine whether your DNS requests are exposed or secure by using these tests. You can check your online privacy and fix any issues by learning DNS leak test and how to fix it.
When and Why You Should Perform a DNS Leak Test
You should run a DNS leak test every time you connect to a new VPN, switch internet networks (such as from Wi-Fi to mobile), or notice unusual internet behavior like sluggish speeds or failed website loading. Frequent testing guarantees the security of your DNS requests. DNS leaks are frequent and frequently go undetected, despite the fact that many users believe their VPN is operating flawlessly.
Anyone who is concerned about online privacy should make it a practice to perform a [DNS leak test and how to fix it] on a regular basis. It assists you in identifying problems early and resolving them before private information is compromised. Regular DNS leak testing is essential for online safety, whether you use the internet for work, play, or private research.
Tools You Can Use to Run a DNS Leak Test
| Tool Name | Main Features | What Makes It Useful |
|---|---|---|
| DNSLeakTest.com | Standard & Extended tests | Simple, easy-to-use for beginners |
| ipleak.net | IP, DNS, WebRTC tests | Shows many privacy details in one place |
| BrowserLeaks.com | DNS, WebRTC, Fingerprint tests | Advanced data for tech-savvy users |
| ExpressVPN DNS Leak Tool | VPN-specific DNS leak check | Trusted by VPN users worldwide |
| Perfect Privacy Test | Real-time DNS leak analysis | Accurate test with fast results |
| NordVPN Leak Test | One-click DNS check | Free tool by a leading VPN brand |
| Doileak.com | Checks DNS, IP, torrent, and more | Great for overall privacy testing |
| Mullvad Browser Test | DNS, tracking, browser settings | Unique browser-focused privacy report |
How to Understand the Results of a DNS Leak Test
The website will display a list of IP addresses and hostnames that answered your DNS queries when you perform a DNS leak test. Your connection is secure if every server displayed is owned by your VPN provider and is situated outside of your country of residence. On the other hand, a DNS leak is occurring if any of the servers are from your ISP or are situated in your home country.
Understanding the outcomes is important for moving forward. Pay close attention to the IP location, country, and ISP name. Your DNS is leaking if anything matches your real location or ISP. Running the test is only one step in a true [DNS leak test and how to fix it] process; another is understanding how to interpret the results and take appropriate action.
How to Fix a DNS Leak Manually
Changing your DNS settings is the first step in manually fixing a DNS leak. A private DNS server, such as Cloudflare DNS (1.1.1.1) or Google DNS (8.8.8.8), can be configured on your computer or network. YouThis overrides your ISP’s default DNS servers.xt, if your VPN doesn’t support IPv6 traffic, you need to turn it off on your device. You can do this in the control panel or network settings.
Flushing your DNS cache, which gets rid of outdated or cached DNS data that can be leaking, is another manual solution. Open the Command Prompt on Windows and enter ipconfig /flushdns. On a Mac, launch Terminal and type sudo killall -HUP mDNSResponder; sudo dscacheutil -flushcache. You’ll have already mastered [DNS leak test and how to fix it] if you comprehend these methods. Although these manual techniques work well, they need constant observation and close attention to detail.
How to Fix a DNS Leak Using a VPN
Using a top-notch VPN with included DNS leak protection is the simplest and most dependable method of repairing DNS leaks. SeeSeekNs with features like a “kill switch” that cuts off internet access in the event that the VPN fails, as well as those that use thetheircret DNS servers. This prevents your device from accidentally contacting your ISP with DNS requests.
Open your VPN app and navigate to the settings or options menu to activate DNS leak protection. Make sure you are using the most recent version of the VPN software and activate DNS leak prevention. It might be time to switch to a more secure VPN provider if your current one lacks these capabilities. You can stay safe with little effort if you know how VPNs work in [DNS leak test and how to fix it].
Tips to Prevent DNS Leaks in the Future
Selecting a trustworthy VPN provider that values privacy is the first step in preventing DNS leaks in the future. Steer clear of free VPNs that employ shared public DNS servers or don’t provide complete protection. Verify that your VPN has features for automatic reconnection, private DNS servers, and IPv6 and DNS leak protection.
To prevent bugs or vulnerabilities, you should also upgrade your operating system and VPN app on a regular basis. After implementing new VPNs, updating software, or changing networks, always do a DNS leak test and how to fix it check. You may prevent surprises and maintain the privacy of your internet activities by making this a regular habit.
Conclusion
It is far more important than ever to secure your online privacy in the current digital era. Even if you believe that a VPN is protecting you, a DNS leak could reveal your private activities. You can take charge of your online safety by knowing about [DNS leak tests and how to correct them]. You now have a comprehensive beginner’s guide on keeping your browsing secret, covering everything from comprehending how DNS works to spotting leaks and repairing them manually or using a VPN.
Do a DNS leak test first thing today. To stop leaks and maintain security, take the actions mentioned above. Protect your digital footprint by acting now rather than waiting until your data has been compromised.
FAQs
What is the main reason DNS leaks happen?
Most DNS leaks happen due to misconfigured VPN settings or operating systems overriding the DNS setup.
Can free VPNs prevent DNS leaks?
Usually not. Free VPNs often lack DNS leak protection and can put your data at risk.
How often should I run a DNS leak test?
You should do this at least once a month or whenever you change VPN providers or network settings.
What is the fastest way to fix a DNS leak?
Use a trusted VPN with built-in DNS leak protection and private DNS servers.
Is disabling IPv6 necessary to stop DNS leaks?
Yes, especially if your VPN doesn’t support IPv6. It can help close a common leak path.