
How to install VPN MacBook Air As access limitations, privacy issues, and online threats increase, more people are using VPNs to improve their online experiences. A VPN provides a private and secure connection whether you’re watching your favorite shows while on the road or browsing at a coffee shop. You may take charge of your online safety with little effort if you know [How to install VPN MacBook Air].
Because MacBook Air users are frequently on the go, they want dependable internet access from multiple locations. Because of their mobility, they are more susceptible to cyberattacks, snooping, and data breaches. Your location will remain hidden and your data will remain encrypted if you install a VPN on your MacBook Air. The goal of this [How to install VPN MacBook Air] guide is to give both novice and expert users a thorough, step-by-step procedure.
Why You Need a VPN on Your MacBook Air
On your MacBook Air, using a VPN is now required rather than optional. VPNs assist in protecting your internet traffic so that hackers, ISPs, and even government monitoring cannot read it. Using public Wi-Fi networks, which are magnets for cybercrime, makes the issue much more important. Gaining knowledge about [How to install VPN MacBook Air] gives you the means to defend against these dangers.
VPNs also let you access region-specific websites, get around geographic limits on streaming services, and avoid internet provider slowdown. These advantages increase your online independence in addition to your privacy. By understanding [How to install VPN MacBook Air], you may take advantage of these benefits without sacrificing performance or security.
Understanding VPN Functionality on macOS
VPNs function by providing a safe, encrypted connection between the internet and your MacBook Air. This tunnel not only conceals your IP address but also safeguards your data from external interference. VPN connections can be made manually using the built-in network options or through third-party software on macOS. Understanding [How to install VPN MacBook Air] simplifies the utilization of these integrated and external technologies.
Apple’s user-friendly system settings make it simple to set up VPNs on macOS. The platform offers several safe choices, including IKEv2, L2TP/IPSec, and third-party OpenVPN protocols. You may switch between these protocols and personalize your connection for maximum security and performance by becoming proficient with [How to install VPN MacBook Air].
Step-by-Step Guide to Installing VPN on MacBook Air
An intelligent method to protect your privacy, encrypt your internet connection, and gain access to region-restricted content on your MacBook Air is to use a virtual private network, or VPN. Setting up a VPN is easy, regardless of whether you’re working remotely or simply want to increase your online security. You can install and utilize a VPN on your MacBook Air with the help of this special and easy-to-follow guide.
Step 1: Choose a Reliable VPN Service
You must choose a VPN service before proceeding. NordVPN, ExpressVPN, Surfshark, ProtonVPN, and CyberGhost are well-liked choices. Make sure the VPN you use has robust privacy policies and is compatible with macOS.
Step 2: Create an Account and Subscribe
After selecting a VPN, visit its official website. Choose a subscription plan that works for you after creating an account. The majority of VPNs provide multi-year, annual, and monthly services.
Note: Don’t download VPN apps from third-party sites. Always use the official website or trusted app stores to avoid malware.
Step 3: Download the VPN App for macOS
Once you have subscribed, search for a VPN software version that is compatible with macOS. To install it on your MacBook Air, click the download button and adhere to the directions.
Pro Tip: If you’re using a MacBook with an M1 or M2 chip, check that the VPN supports Apple Silicon for better performance.
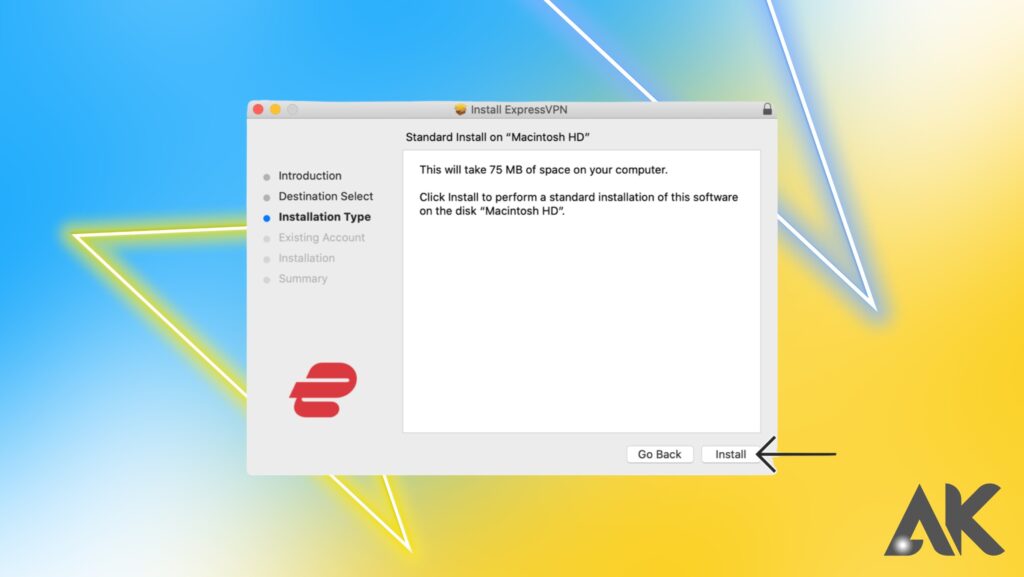
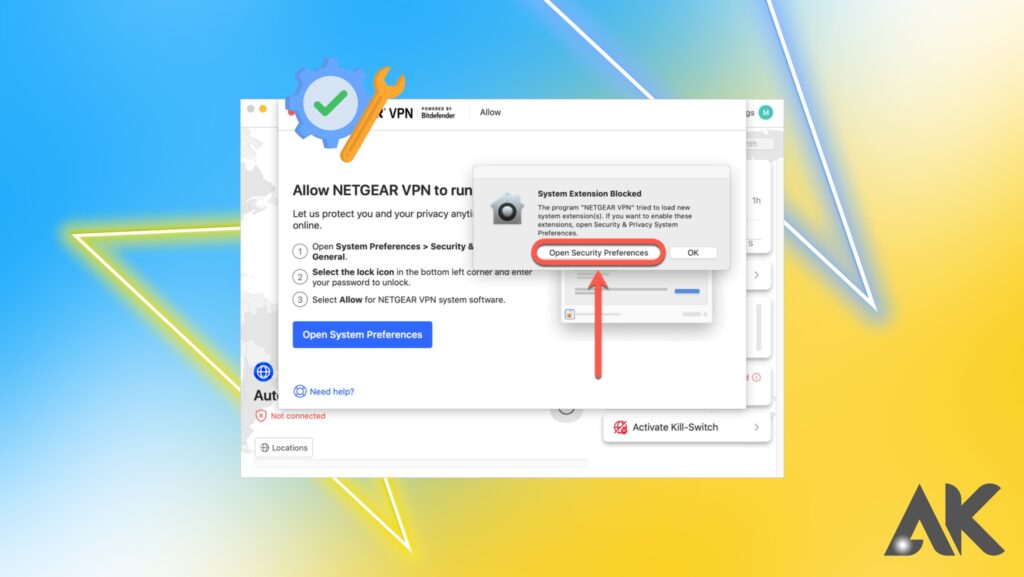
Step 4: Install and Grant Permissions
Follow the installation instructions after opening the downloaded file, which is often a.dmg file. The application might ask you to move it into your Applications folder. Open the VPN app when it has been installed.
macOS will likely ask for permission to allow the VPN configuration. You’ll need to enter your MacBook password to grant this permission.
Step 5: Log In and Configure Settings
Launch the VPN app, then sign in using the credentials you already created. The interface of most apps is straightforward. You can turn on auto-connect, change security settings, and choose server locations.
Suggestion: Set the VPN to launch at startup and connect automatically. This ensures you’re protected every time you go online.
Step 6: Connect to a Server
Choose a server location according to your needs; remote servers allow you to view content from other countries, while closer servers provide faster speeds. Your VPN will establish a secure tunnel for your internet connection once you click “Connect.”
Once connected, your MacBook Air’s internet traffic is encrypted and masked.
Step 7: Test Your VPN Connection
Visit websites like https://www.whatismyip.com or https://ipleak.net to verify that your IP address has changed. This confirms your VPN is working correctly.
If something seems off, try switching servers or restarting the VPN app.
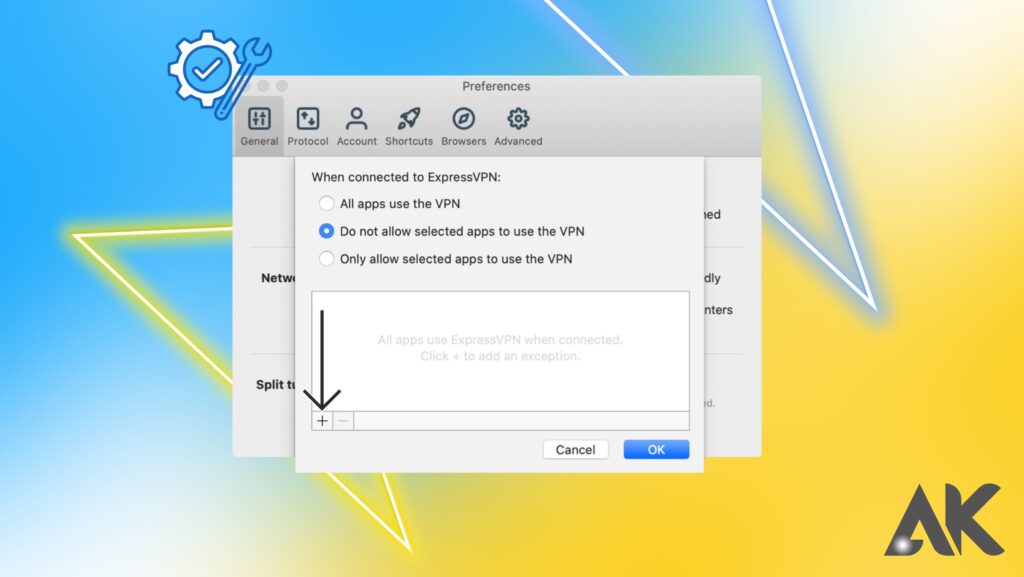
Step 8: Customize for Better Privacy
Many VPNs offer extra settings like:
- Kill Switch: Cuts internet if VPN disconnects.
- Split Tunneling: Allows some apps to bypass the VPN.
- Ad Blockers: Built-in blockers for ads and trackers.
Explore these in your app settings for a more tailored experience.
Step 9: Keep Your VPN Updated
VPN providers regularly release updates to patch vulnerabilities and improve performance. Enable automatic updates or check manually to ensure you’re always protected.
Step 10: Disconnect When Needed
Simply launch the VPN software and select “Disconnect” if you ever need to disconnect. You can also use your menu bar to exit the application. Just keep in mind that your traffic is no longer encrypted if you do not have a VPN.
Is It Legal and Safe to Use VPNs on MacBook Air?
Issues about safety or the law make many people hesitant to use VPNs. The positive news is that most nations, including the US, Canada, and a large portion of Europe, allow the use of VPNs. It’s crucial to make sure you’re not breaking any terms of service for specific websites or services, though. You can maintain compliance with regional laws and regulations by learning [How to install VPN MacBook Air] responsibly.
If you pick a trustworthy service, using a VPN is also safe. Due to subpar encryption or dubious logging practices, free VPNs can occasionally provide privacy problems. Always choose reputable, well-known services with transparent privacy policies and secure protocols to protect your data when investigating [How to install VPN MacBook Air].
Top VPN Providers Compatible with MacBook Air
Understanding which VPN services give the best features and compatibility for macOS is useful when researching [How to install VPN MacBook Air]. Prominent choices with user-friendly interfaces include macOS-native apps like ExpressVPN, NordVPN, Surfshark, and CyberGhost. Strong encryption, no-logs rules, and quick server networks are also supported by these companies.
Selecting a reliable VPN guarantees minimal speed loss, seamless integration with your MacBook Air, and excellent customer service. To stay compatible with the most recent macOS upgrades, these VPNs regularly update their programs. Such maintenance is essential for both long-term performance and successfully completing the [How to install VPN MacBook Air] processes.
How to Download a VPN App on MacBook Air
A VPN app from a reputable provider must be downloaded as the first step in [How to install VPN MacBook Air]. Find the macOS download option on the official website of the VPN service of your choice. Avoid downloading VPN software from unapproved websites, as this may expose your MacBook to security risks or malware.
Open the installer file after downloading it, then adhere to the installation instructions. Usually, the process entails dropping the application into your Applications folder and obtaining the required rights. You’re one step closer to protecting your MacBook Air with a private and encrypted connection after installing the program.
Troubleshooting VPN Installation Issues on MacBook Air
Issues may occur even if you have taken every possible step. Verify that your macOS is up to date and that you have granted the necessary permissions if the VPN program fails to open. If you’re experiencing connection issues, please consider restarting your MacBook Air or reinstalling the VPN program from the official website. The majority of issues with [How to install VPN MacBook Air] are resolved by following these simple instructions.
For enduring problems, speak with customer service or the help center of your VPN supplier. The majority of premium VPNs provide FAQs, live chat, and comprehensive instructions. Seeking assistance guarantees that minor setbacks or system incompatibilities won’t cause your [How to install VPN MacBook Air] journey to stall.
Conclusion
Make the most of it by choosing reliable server locations, creating secure passwords, and turning on kill switches now that you know [How to install VPN MacBook Air]. Always connect when using public Wi-Fi and configure the VPN to start up automatically. These practices guarantee that your VPN offers continuous safety.
Despite the real and constant increase in digital threats in 2025, a VPN provides you with a strong defense. Gaining proficiency in [How to install VPN MacBook Air] will allow you to browse the internet more safely, access content without limitations, and enjoy total independence. Secure your MacBook Air now rather than later.
FAQs
Is it free to install a VPN on a MacBook Air?
You can find both free and paid VPN options. However, paid VPNs offer better security and faster speeds.
Can I install any VPN on MacBook Air?
Most major VPN providers support macOS. Just ensure you download from official sources.
Do I need technical skills to install a VPN?
No, most VPN apps offer easy installation and setup for all users.
Is it legal to use a VPN on a MacBook Air?
Yes, VPN use is legal in most countries. Check your local laws to be sure.