

How to add VPN in Windows 10 Why Should Users of Windows 10 Use a VPN? Given the growing concerns about internet privacy and security, using a VPN (Virtual Private Network) on Windows 10 is an excellent way to protect your data. But how does one add a VPN to Windows 10? Despite its seeming complexity, Windows 10 simplifies the procedure by enabling VPN connections by default.
This article will show you how to add a VPN manually or with a VPN app, guaranteeing a private and secure connection.
What is a VPN and Why Use One?
By creating a secure, encrypted connection between your device and the internet, a Virtual Private Network, or VPN, is a technology that helps safeguard your online privacy. By passing your internet traffic through a distant server, a virtual private network (VPN) conceals your true IP address and gives the impression that you are browsing from a different place. This stops your internet service provider (ISP), advertising, and websites from monitoring your online activity. In essence, a VPN serves as a virtual tunnel that protects your private information from prying eyes and guarantees a safer online experience.
Different Ways to Add a VPN in Windows 10
There are multiple methods for adding a VPN in Windows 10, each of which can accommodate varying degrees of technical proficiency and individual preferences. Using the VPN app that comes with Windows 10 is one of the simplest ways. For people who already have VPN login credentials from a service provider, university, or place of employment, this is the ideal choice.
You can manually enter the server address, select the VPN protocol, and enter your login credentials straight into Windows’ settings in a few simple steps. For individuals who prefer a hands-on approach, it’s a clean and effective option because it’s a simple process that eliminates the need for additional software.
1️⃣ Manual Setup: Using Windows settings to add a VPN connection.
2️⃣ Using a VPN App: Installing and configuring the software of a VPN provider.
Let’s examine each approach in more detail.
How to add VPN in Windows 10
Adding a virtual private network (VPN) to Windows 10 is an easy way to increase your online privacy and security. Windows 10 makes setting up a VPN simple, whether you’re using a personal VPN for streaming or a business VPN for work. Here is a detailed tutorial to get you going.
Step 1: Gather Your VPN Information
Before diving into the setup, you’ll need some key details:
- VPN Provider: Whether it’s your workplace, a school, or a VPN service you’ve subscribed to.
- Server Address: Provided by your VPN provider.
- VPN Type: The protocol (like PPTP, L2TP/IPsec, SSTP, or IKEv2) used to connect.
- Login Credentials: Username, password, or other authentication methods.
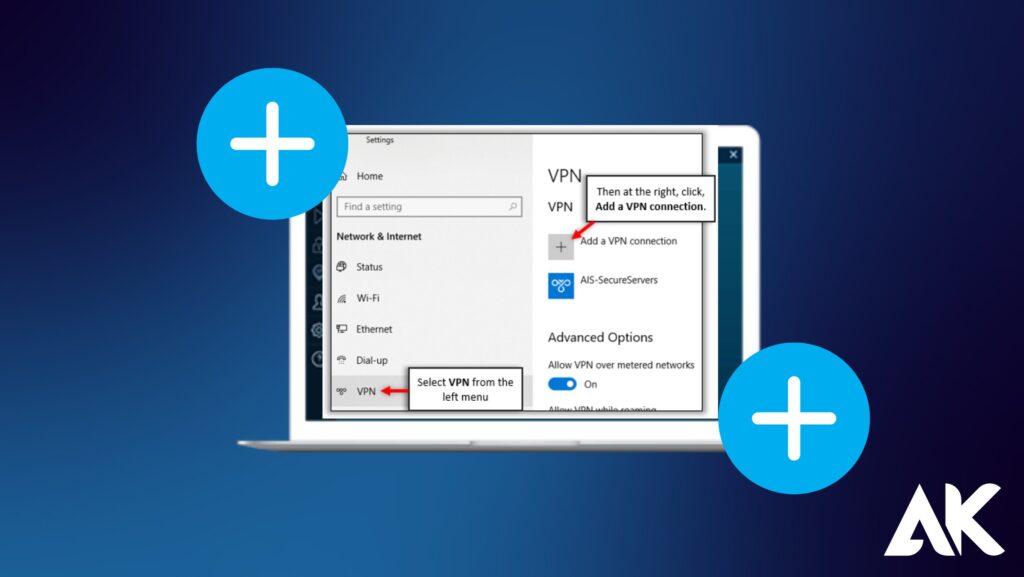
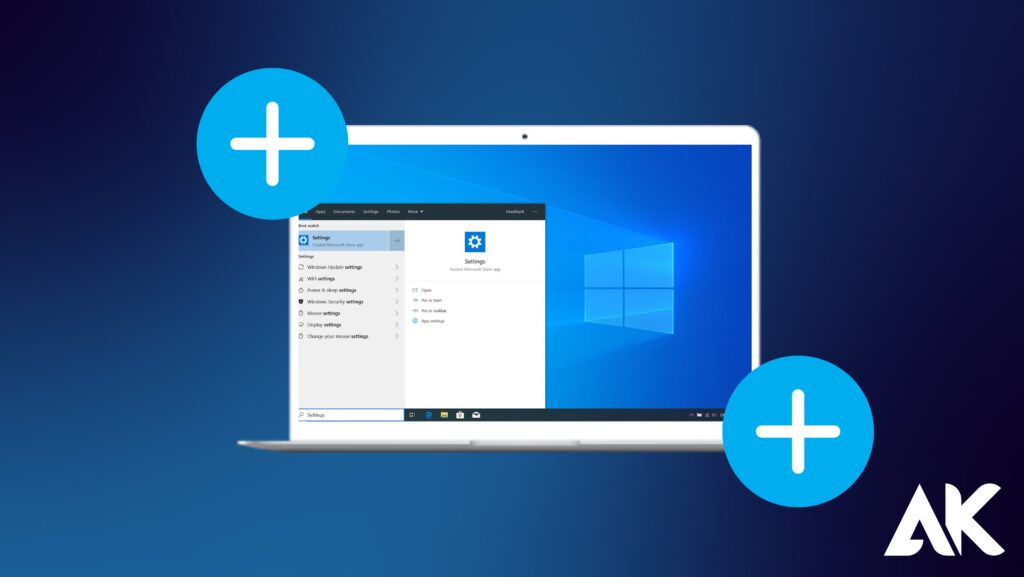
Step 2: Open VPN Settings
- Click the Start Menu and select the Settings icon (it looks like a gear).
- Go to Network & Internet.
- Click on VPN in the left-hand menu.
- Click Add a VPN Connection.
Step 3: Configure the VPN
- VPN Provider: Choose Windows (built-in).
- Connection Name: Enter a name for your VPN connection (e.g., “Work VPN” or “My Private VPN”).
- Server Name or Address: Type in the server address provided by your VPN service.
- VPN Type: Select the correct protocol (PPTP, L2TP/IPsec, SSTP, or IKEv2) from the dropdown.
- Type of Sign-in Info: Choose how you’ll log in — this could be a username and password, a certificate, or a smart card.
- Username and Password: Enter your credentials if required.
- Click Save.
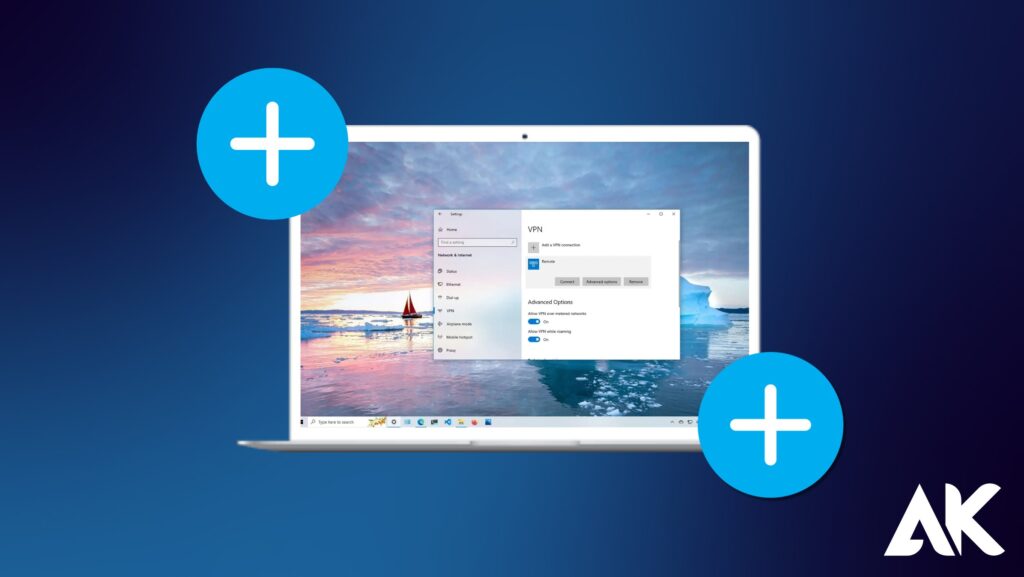
Step 4: Connect to Your VPN
- In the VPN settings window, find the VPN connection you just added.
- Click on it and hit Connect.
- Once connected, you’ll see a small lock icon in your system tray, indicating your VPN is active.
Troubleshooting Tips
- If the connection fails, double-check your server address and login details.
- Ensure your selected VPN type matches what your provider supports.
- If you’re behind a firewall, you may need to allow the VPN through your security settings.
You can easily add a VPN to Windows 10 and take advantage of a more secure, private browsing experience by following these easy steps. If you want to look at other VPN settings or go into troubleshooting advice, let me know!
How to Add a VPN Using a VPN App
One of the simplest and quickest ways to add a VPN to Windows 10 is to use a specialized program. The majority of VPN companies provide easy-to-use apps that take care of all the setup. Here’s a quick tutorial on setting up a VPN with an app.
Step 1: Choose a VPN Provider and Download the App
- Select a VPN Service: Pick a reliable VPN provider that suits your needs — whether it’s for streaming, gaming, or security. Popular options include NordVPN, ExpressVPN, and ProtonVPN.
- Create an Account: Sign up for the service and choose a subscription plan (many offer free trials).
- Download the App: Go to the VPN provider’s official website and download the Windows app. Avoid downloading apps from third-party sources to ensure security.
Step 2: Install and Set Up the App
- Run the Installer: Open the downloaded file and follow the on-screen instructions to install the app.
- Log In: Launch the app and sign in with your account credentials.
- Permissions: The app may request network permissions — allow these for the VPN to function properly.
Step 3: Connect to a VPN Server
- Choose a Server: Most apps let you select a server location. Choose a country or city depending on your needs, like accessing region-locked content or ensuring the fastest connection.
- Click Connect: Hit the “Connect” button, and the app will establish the VPN connection.
- Verify Connection: You’ll typically see a notification or green icon indicating the VPN is active. You can double-check your IP address online to confirm the change.
Additional Features
- Kill Switch: Some apps offer a kill switch, which disconnects you from the internet if the VPN drops, ensuring your real IP stays hidden.
- Auto-Connect: Set the app to automatically connect every time you start your computer or access public Wi-Fi.
The process is made simpler by using a VPN program; there is no need to go into Windows settings. You may access worldwide information and browse safely with a few clicks. If you want to examine advanced options or compare several apps, let me know! 🌐
Choosing the Right VPN Protocol for Windows 10
| Protocol | Speed | Security | Best For |
|---|---|---|---|
| OpenVPN | Fast | Very High | Overall security and flexibility |
| IKEv2/IPSec | Very Fast | High | Mobile devices and stability |
| L2TP/IPSec | Moderate | Moderate | Older devices and compatibility |
| PPTP | Very Fast | Low | Streaming and light browsing |
| WireGuard | Extremely Fast | Very High | Modern devices and performance |
Quick Tip: For the best balance of speed and security, OpenVPN or WireGuard are top choices for Windows 10. Let me know if you’d like more details! 🚀
Configuring VPN Advanced Settings
in Windows 10 helps boost security and performance. Key options include:
- Protocol Selection: Choose OpenVPN, IKEv2, or WireGuard for the best balance of speed and security.
- Kill Switch: Automatically cuts internet access if the VPN disconnects to prevent data leaks.
- Split Tunneling: Allows selected apps to bypass the VPN, improving speed and flexibility.
- DNS Leak Protection: Ensures all DNS requests go through the VPN, keeping your browsing private.
- Auto-Connect: Reconnects the VPN automatically if the connection drops, maintaining constant protection.
Tweak these settings to suit your needs and enhance your VPN experience!
Connecting and Disconnecting from a VPN in Windows 10
To Connect:
- Click the Start Menu and select Settings.
- Go to Network & Internet and select VPN from the left sidebar.
- Click on your VPN connection, then hit the Connect button.
- Enter your username and password if prompted, and wait for the status to change to Connected.
To Disconnect:
- Return to the VPN Settings page.
- Click on your active VPN connection and select Disconnect.
You can also connect and disconnect directly from the Network icon in the taskbar for quicker access. Simple, right? 🌐
How to Fix VPN Connection Issues in Windows 10
can be simple if you follow these troubleshooting steps:
- Check Your Internet Connection:
- Ensure your device is connected to the internet. A VPN can’t work without a stable connection.
- Restart the VPN and Your Device:
- Disconnect the VPN, close the app, and restart your computer. Then, try reconnecting.
- Update VPN Software:
- Ensure you’re using the latest version of your VPN app. Outdated software can cause connection problems.
- Verify Login Credentials:
- Double-check your username and password — incorrect credentials can prevent connection.
- Switch VPN Protocols:
- Go to your VPN settings and try switching between protocols (e.g., OpenVPN, IKEv2, or L2TP) to see if one works better.
- Check Firewall and Antivirus Settings:
- Sometimes firewalls or antivirus programs block VPN traffic. Temporarily disable them to test if that’s the issue.
- Flush DNS and Reset Network Settings:
- Open Command Prompt as Admin and type: bashCopyEdit
ipconfig /flushdns netsh winsock resetRestart your computer afterward.
- Open Command Prompt as Admin and type: bashCopyEdit
- Change Server Location:
- Some servers might be down. Try connecting to a different server in the VPN app.
- Contact Support:
- If nothing works, reach out to your VPN provider’s support team. They often have specialized solutions.
By following these steps, you’ll likely get your VPN running smoothly again! Need more help? Let me know. 🌐
Are Free VPNs Safe for Windows 10?
Many people ask, Can I use a free VPN on Windows 10?
✔ Pros: Free VPNs hide your IP and encrypt data.
❌ Cons: Many free VPNs log user data, show ads, or have weak encryption.
| Feature | Free VPN | Paid VPN |
|---|---|---|
| Security | ❌ Weak encryption | ✅ Strong encryption (AES-256) |
| Privacy | ❌ Logs & sells data | ✅ No-log policy |
| Speed | ❌ Slow & limited | ✅ Fast & unlimited |
For best security, use a paid VPN like ExpressVPN, NordVPN, or Surfshark.
Conclusion
It’s simple to add a VPN to Windows 10, which improves online activity security and privacy. Whether you set it up manually or using a VPN app, you can benefit from data privacy, safe browsing, and access to banned content. Just choose a trustworthy VPN provider, follow the directions, and start browsing securely. If you have any issues, check your network settings or contact your VPN support team.
FAQs
Is it possible to configure a VPN on Windows 10 without an app?
Yes, the ability to manually set up a VPN is incorporated into Windows 10. You can add a new VPN connection, enter the information your VPN provider has given you, then navigate to Settings > Network & Internet > VPN.
Does adding a VPN in Windows 10 require a VPN subscription?
Yes, a VPN subscription from a reputable VPN service is usually required. There are a few free VPN services out there, but they frequently lack functionality and might not be as safe as premium ones.
Why is Windows 10 preventing my VPN from connecting?
Check your internet connection, update your VPN settings, turn off firewall restrictions, or restart your device if your VPN isn’t connecting. Speak with the support staff of your VPN provider if the problem continues.
Can I use Windows 10 with a free VPN?
Sure, you can use a free VPN, but it can be slower, have fewer servers, and be less secure. Using a reliable, premium VPN provider is advised for improved performance and privacy.
How can I tell if my Windows 10 VPN is operational?
Check your VPN’s functionality by going to a website such as whatismyipaddress.com both before and after connecting. Your VPN is operating correctly if your IP address changes.